
Today I start my second practicum!! It's at the same school as my first practicum, but with a grade 2 class instead of a grade 6 class. I'm really excited! I love the primary grades!
So, this is what I did over my exam week:

I had an exam on Monday and Tuesday, so that left Wednesday
to Sunday open for Crafting Extravaganza! It was a great five days. The dresser
was my big, ongoing project, but I had a lot of other mini-projects and cooking
projects on the go throughout the five days as well. Check it out:

I made a small ceramic chalk board,
And I stenciled an area rug for my bedroom (not pictured above).
And in the kitchen:

I cooked up some chicken parmesan meatloaf,
And I baked some BBQ sauce meatloaf.
I’ll be blogging about those things soon, and linking as I
do.
So, there were a few reasons I wanted to give this dresser a
bit of a facelift. It was very dated with its 70’s-esque orange wood finish and
wannabe-antique brass hardware. It had a lot of dings in the finish from decades of regular use. It
didn’t go with any of my bedroom décor. Oh, and this demonic bunny:
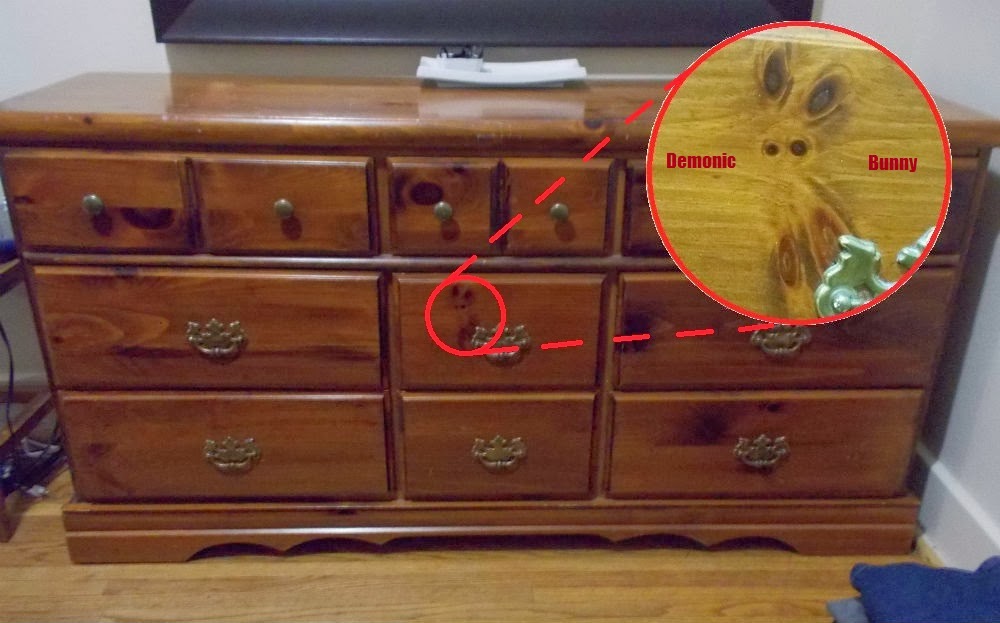 |
| Demonic Bunny |
That evil little monster has been watching me for years! I’m
a little concerned that he’s now going to seek revenge for being covered up… but
how…
Anyways, the process was long and time consuming, but pretty
easy and straight forward. Painting was seriously easy because of this gem of a
product:

Annie Sloan Chalk Paints are my new favourite paints of all
time! They are best known for their ability to adhere to pretty much anything.
No sanding, no priming, just wash the surface and go. And no odor or fumes. Mind you, they are quite
expensive and hard to find locally. They aren’t available in my city, so I had
to get my brother to pick some up in his city and deliver them to me when we
saw each other a few weeks ago.
I used a foam roller for the large areas, and a foam brush
for finicky spots. I ended up using 2 coats of paint on everything, except the
inside of the drawers, which required 3 coats. I assume inside the drawers took more paint because
the wood was unfinished and, due to its age, was probably very thirsty.
After one coat the wood looked like it had a beautiful aged
paint wash. I think that effect would look so good with traditional farmhouse
décor.

Anyways, as much as I didn’t need to sand the dresser for
the paint to adhere, I did need to sand the top because it was old and gouged,
and the finish was cracked and bubbly. Wood filler was a near and dear friend
during this project.

First I painted the sides and the front

Then I painted the top

Then I finished the drawers, which is going to be detailed
in next week’s post because it was a multi-step project all by itself. I will
link when I post.
I covered everything with one coat of satin polyurethane. I
did not do this step very well. I suppose I need more practice. And I probably
should have done two coats, but that wasn’t a fun step, so I called it at “good
enough.” The shine is just inconsistent when the light hits it at certain
angles.
Also, while I was at the thrift shop finding a pot lid to
turn into a clock, I came across an old silverware chest with a rich blue
velvet interior.

I thought it would be a nice touch on top of my dresser to
hold things I don’t really like showing off, like my deodorant and hair ties.
 |
| Don't Look at these things. |
It was stained wood, so I painted the exterior with the same
Annie Sloan paint as the dresser and covered it with the same polyurethane.

And, of course, my DIY “Trinkets” sharpie-on-ceramic dish is
still featured prominently.

Look at the loveliness! The mirror goes with it perfectly!
Way better than the big ol' hutch that used to perch up there.

Now to find something for that space to the right of the
box. I’m thinking something like this:

It’s only horrifically overpriced… that’s ok, right? A girl
can dream.
No comments:
Post a Comment